How to draw a portrait.
How to draw a portrait in six easy steps.
Step 1:
The Grid method is another easy way to reproduce, scale down or enlarge a picture. The grid method basically means using a grid to divide your picture into segments.
Its a great way to to learn how to draw a portrait and is used by many artists.
It involves applying a grid over the top of an image prior to drawing it. This method can be applied to any type of picture and has proved very popular for many artists.
Its uses not only involve scaling or enlarging photos, magazine pictures and other photo media. It can also be used in other situations. Examples of using the grid method can even be seen in children's comics and books. Also references to the use of grids date back hundreds of years. With that said, the grid method's a great way to start out. It really helps you begin to understand the idea of scale, proportion, line and shape.

Cropping an image before drawing it.
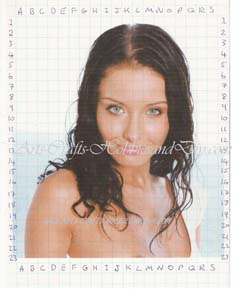
First choose your picture and crop it accordingly. The original image I chose was of a full body semi nude which unfortunately I cannnot display, however I only wanted to copy the face and shoulders to just below the hairline. Using MS paint or whatever photo editing suite you have you can crop the picture accordingly as shown. If the picture you want to copy is in a magazine or book scan the image into your editing suite. However, if you just want to draw the image but not keep the picture you can draw your grid straight onto it. See Below:

Drawing a portrait from a grid: Marking out the grid.
To draw the portrait you will first need to mark out your grid. To do this measure equally down each side of the picture using a pencil and a ruler. Make sure that all your spaces are the same, for example, 1cm apart. You will need to start at the top of the page and mark down all sides of the page. Now when you join all your points together you will end up with a grid as shown in the picture. It is very important that you only use a sharp pencil and apply medium pressure when drawing your lines on the reference picture.
HINT: I have found that by using my PC to process the image I can sometimes print my image straight onto graph paper. This saves me a lot of time. This method works well if the image is quite light but you will find that darker images tend to hide the grid lines as can be seen around the hair in the picture.
I then scan the image.
I also use standard A4 grid paper as it fits nicely into my printer. By scanning the image of the picture with the grid applied to it, it makes things easier when you come to draw the picture as you can enlarge the scanned image to get a better idea of how everything looks and exactly where each line crosses and meets on the grid.
How to draw a portrait using a drawing board.
Another method I use is a Drawing board. Using a drawing board is much quicker. I also find that it is also more accurate than measuring down each side of the picture. This is because the drawing board has a rule already marked out on it. All you need to do is line your paper up with the pre-set marks on the drawing board. Then move the T-square between each point and draw a light line right across the page. Also, you only have to turn the page once to draw your lines both ways.
 Adding reference points
To do this I put numbers down each side and use the alphabet along the top and bottom of the page. This for me works quite well as for instants in the picture to the right you can see that the top of the head is located at reference points 1K, 1L, 1M and starts sloping down at reference point 2J and 2N. The tip of the shoulder is at the intersection point 15D. I always put the reference points on all sides of the page as it makes it far easier to reference a point when drawing as I tend to work from both sides of the page.
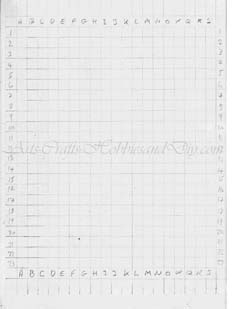
Portrait drawing: Preparing your blank page.
Once you have completed marking out your picture you will then need to do the same on a blank sheet of paper be it lose or in your sketchbook. I am using A4 again as this is for demonstration purposes. It is also the same size as the original picture that I want to copy but you can use any size of paper you like. Using A4 is the most convenient size paper to use as it fits nicely into most standard printers or scanners enabling you to scan, copy, edit or print your image if required. I will use my drawing board to draw my portrait as once the page is marked out I can attach the paper to it and begin my drawing.
See below:
 If you want to scale up or enlarge the drawing then you will need to make your squares bigger. For example, if your grid on the picture has squares that are 1cm apart and you want to double the size of the image then you will have to allow 2cm's between each line. Remember also that you may need a bigger sheet of paper to fit the scaled-up image onto.
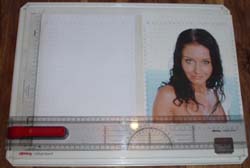
NB: you can purchase a drawing board similar to the one shown HERE!.
Top 5 shading mistakes.