How to draw the female body.
How to draw the female body for absolute beginner's, PT1.
The wireframe or stickman method.
I have written this tutorial on how to draw the female body as a learner myself. So if you have never put pencil to paper before, do not despair. I am certain that if I can do it so can you.
I'm not an accomplished artist and the main reason I am doing this is that it has always been something I have wanted to achieve. There are however, many ways to draw human figures but I have chosen the stickman method, to begin with.
Basic proportions of the body.
Stage 1:
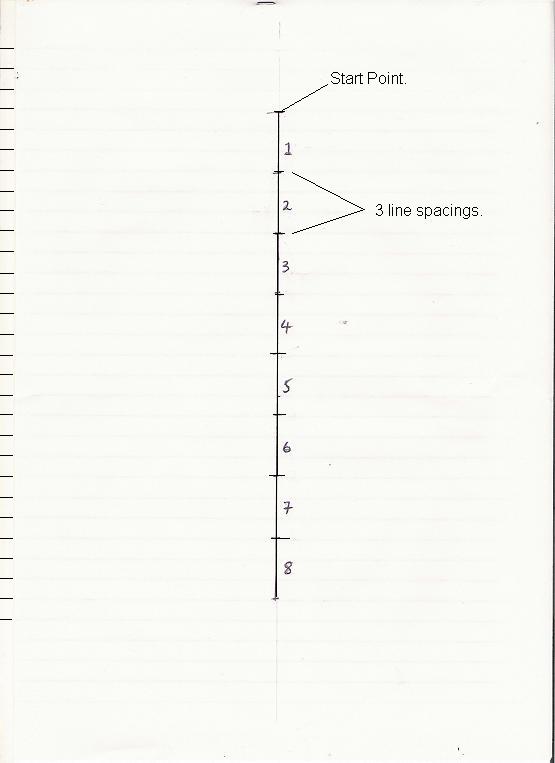
In order to get a basic idea of how to proportion your drawing/sketch, you will first need to use a sheet of A4 lined paper that you will use as a guide under your blank sheet of drawing paper, as shown below.
I will use this method as it is simple and makes the process of proportioning your subject easier to understand.
You may need to use a black biro/pen and a ruler to go over the lines on your guide paper so that they are more visible for the next stage. Once you are happy that the lines of your lined paper are dark enough you can place a sheet of blank A4 paper over the top of it.
However, if after going over your lined paper with a biro, your lines are still not visible enough through the paper try moving the top layer slightly to one side so that you can see them. Using a ruler you will then be able to project your lines onto the blank sheet and follow the steps below.
Tip: Another way to set out your drawing is to use a Drawing board some of these have pre-set rulers on their edges.
How to proportion a body into equal parts.
Firstly, draw a light line down the centre of your blank page using a ruler and then divide the line into equal parts. I made a mark 4 lines down from the top of the page which will be my start point. then counted every 3 lines and continued to mark the page until I had 8 equal parts. NB: It isn't compulsory that you use an A4 sheet of paper. You can use any size you like, Just make sure you divide your line into eight equal parts. You will also find variations on this method as some artists prefer to divide the subject into 7 equal parts.
Drawing the head.
Stage 2:
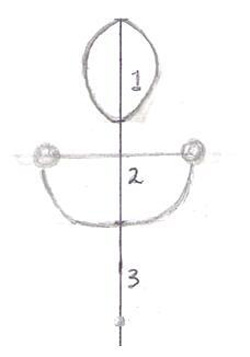
Secondly draw an oval with its narrower end at its base in the first space marked 1. Don't worry if it isn't perfect, as after all, we are beginners.
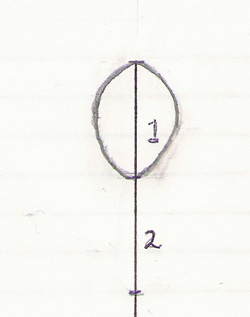
For now, we will be setting out the general positioning of our female body.
The essential, bestselling guide for all artists who draw the human figure!
Setting out the shoulders.
Stage 3:
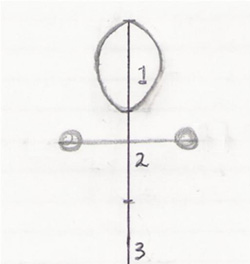
I am now going to set out my points for the shoulders starting about 1/3rd of the way down space number 2. To do this I am going to draw a horizontal straight line across my centre line. At the end of the line, I am going to draw a small circle approximately one head width from the centre line. This will designate the shoulder joints. Try to take into account the fact that in most, but not all cases a woman's shoulders are usually narrower than a mans. Using the end of your pencil to check, make sure they are spaced equally apart. It is important that we get this bit right as the shoulder width will be used to designate the width of the hips later.
Drawing the chest position in relation to the body.
Stage 4:
Next, set out the centre of the chest at approximately 1 head; lower than the chin. The way I prefer to do this is to imagine a capital D and use the line I have drawn for the shoulders as the back of the D and then join the two points for the shoulders with the front of the D. This should place the chest in roughly the correct position as shown below.
The naval will be roughly at the bottom of section 3.
How to draw the hips and Groin.
Stage 5:
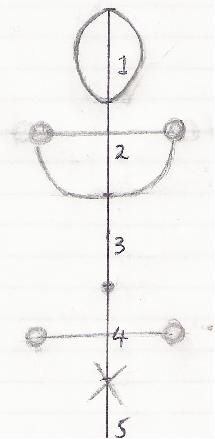
The hips need to be about 1/2 way between the naval and the groin area. This will be 4 head lengths down the body. When setting out the hips make sure they are positioned in line with the shoulders. This isn't always the case when figure drawing as human anatomy varies greatly but for this tutorial, it will suffice.
Drawing the female body, how to draw legs.
Stage 6:
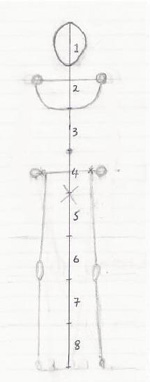
Legs are fairly easy to set out. Firstly, imagine that the point at 5 heads down is approximately the centre of the thigh. Secondly, the point just above 6 heads down is the knee joint. Thirdly, at 7 heads is the centre of the shin/ calf muscle and fourthly the point at 8 heads is the top of the ankle you can line in roughly the centre of the leg. Remember to position the leg taking into account that the hip point is the widest point. This means you will need to position your point for the top of the leg slightly in from the hip to allow for the width of the leg. See below.
Stage 7:
How to draw the female body. Drawing basic arms.
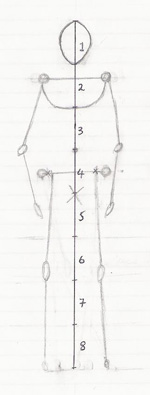
Again the arms are fairly easy to set out. Pick a point around the naval area at 3 heads down and mark where you want the elbow to be. Next, pick a point around the thigh area about halfway between the 4 and 5 heads mark. At this point mark where you would like the hands to be. Line in roughly the centre of the arm the same as you did with the leg. This can be seen above. You now have your basic wireframe or stickman.
how to draw the female body.