Drawing a face using a photo image.
How to draw an accurate portrait.
Drawing a face using a photo image
Drawing a face using a photo image helps you get everything in the correct place. Also its another great way to demonstrate the benefits of dividing the face into equal parts. I have applied the same principles as in the Basic facial detail tutorial and applied it to my sketch. Using this method is a great way to practice drawing the female face.
Dividing the photo image up.
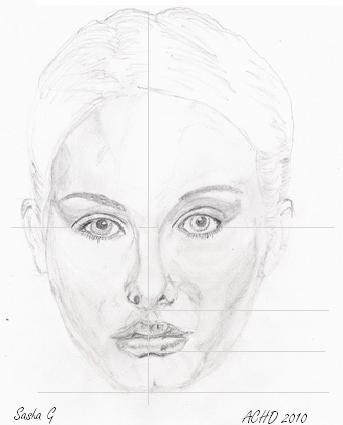
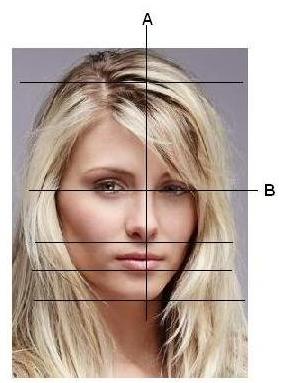
When drawing the face, firstly I divide the photographs into equal parts starting from approximately the midpoint of the eyes. As shown below. The bottom half of the face has then been divided in half and then the lower part has been divided in half again to demonstrate the guide points that we discussed in the previous tutorial. for the base of the nose, the mouth and the base of the chin.
Remember, as discussed previously, all head shapes and faces vary so the proportions will differ from subject to subject. Also remember when drawing a face, the lines are only guide points. The face is the most important part of your drawing as it tells the viewer about the person. It can depict their mood, their thoughts or even their intent and sometimes it can reveal the type of life they are leading. The image shown last for the first portrait is a more up to date re-draw of my Sasha G photo using the same method as above.
Just to show that the more your practice, the better you will become.
The benefits of using artists dividers.
For the later face drawing, using the same photo, I also used a set of artists dividers along with my reference points to accurately set out the features of the face, which as you can see from the end portrait, it made a great improvement. (To purchase your own set of dividers, use this link.( artists dividers. ) 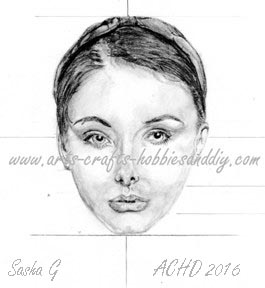
Also when drawing the face using a photo image I incorporated some of the many techniques included in the tutorials within this site. Links for which can be found in the left-hand sidebar.
Most importantly, the new images demonstrate that if you continue to practice you will get better and improve. By dividing the face up you can then use the points to plot the shape and proportions of the face. This is done by measuring from the centre line to each side of the face as shown below in the outline image of Nicole.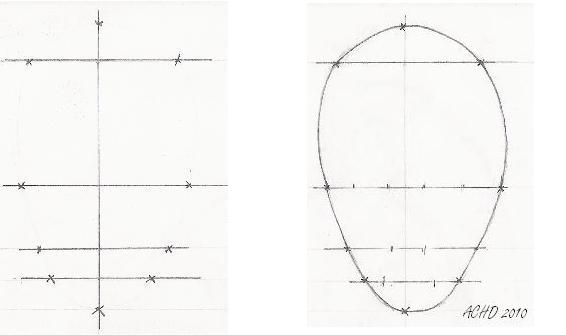
This gives me the basic shape of the face and also helps me to judge where everything else fits in. When drawing a face the proportions are very important. When you have finished your basic outline you can then fine-tune the shape of the face later.
Adding extra lines when drawing a face from a photo.
You can also add extra lines when Drawing a face using a photo image to help you get accurate measurements for the facial features which are demonstrated in the 2016 re-draw of Nicole which can be seen lower down the page.
Always make sure when setting out your subject that its large enough to be able to add the facial detail. I say this because through my own experience, the smaller I have tried to draw the subject, the harder it has been to recreate a convincing likeness. It becomes extremely hard to add details, especially when doing the eyes and lips. 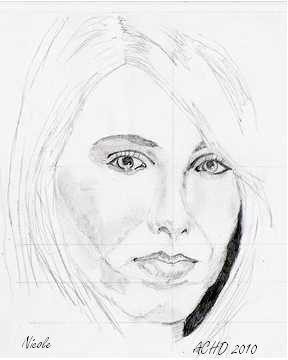
The eyes and lips hold the mood and personality of the subject so no matter how well you draw them, if they are not a convincing likeness the picture will not portray what you have set out to do. As shown in the two early attempts above of Sasha G 2010 and Nicole 2010, I still have a long way to go. However I will continue to practice until I achieve my goal. I cannot emphasise enough how important it is to take your time and never give up. Try to draw at every opportunity even if it is only for a few minutes a day. 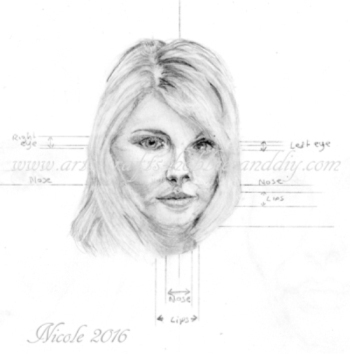
How to draw portraits using a photo image.
In the next tutorial we will be learning how to draw a portrait using the grid method. The grid method is another great way to draw as it helps get all the proportions and details set out correctly. It can also be used to accurately reduce or enlarge an image.
Tip: It is very important that you always use sharp pencils for your detail work. Pencils are best sharpened using a craft knife as you can get a longer sharper point. You can also use fine sandpaper to sharpen a fine point if you have used a standard pencil sharpener. Also try to rotate the pencil as you draw as this will help to maintain a sharp point.
When to walk away when drawing a face from a photo.
If you are struggling to get a detail right, leave it and walk away. Walking away then coming back later and having another go puts fresh eyes on your work making a better job of what your trying to achieve. Also you will tend to be able to see the more obvious mistakes that eluded you at your first attempt. This also helps avoid rash judgments based on frustration that may result in you giving up or binning your sketch.
Another good way to see if your sketch is going well is to view it upside down. This helps you see the obvious mistakes that are invisible when you look at your sketch the right way up.
Always make sure you use a sharp pencil when doing your initial sketched outline. The thicker the lines, the harder it is to define the shape and proportion of the details of the face. Also by having a thicker line your mistakes can look worse than they actually are.
Drawing using mechanical Pencils.
Since first writing this tutorial on drawing a face using a photo image I have started to use mechanical pencils which can be purchased with a wide range of lead thicknesses from 0.3 0.5 0.7 0.9. they also come in different grades and at the moment I am experimenting with a 0.7mm 3B and a 0.4mm 4H. I am finding them great for doing detail in the hair, eyes, eyebrows and lips.
I have also just ordered some Tombow mono zero erasers which I am keen to try out as they are excellent for removing small areas and picking out details when drawing with pencils