Drawing elephants.
How to draw an Elephant.
How to draw an Elephant in five easy steps.
Step 1: Drawing Elephants.
In this tutorial on drawing elephants, you will first draw your initial elephant outline using the grid method to copy your elephant picture from a reference picture or photo. You will then draw your elephant using a step by step guide, on how to draw an elephant. You will then add details to your elephant drawing as you go. Starting from the head and ears and slowly working down the elephant's body, building the picture in stages. In this tutorial on drawing elephants I will show you how to first draw your initial elephant outline using the grid method. This will make it easier to copy your elephant from a picture or photo. Then in a step by step guide, how to add the details to your elephant, starting from the elephants head and ears and slowly working down the elephants body, building your elephant picture as you go.
Why use the grid method to draw?
The Grid method is a much quicker and easier way to reproduce, scale down or enlarge a picture.
What is the grid method?
The grid method, as the name suggests, means you will be using a grid to divide your picture into equal segments. This is done by applying it over the top of an image prior to drawing it. It can then be reproduced on a fresh piece of paper or sketch pad by also adding a grid on it. This enables you to copy the image using the grid as a guide for where to draw your lines. In this case, you will be using it for your elephants drawing.
Choosing the right image to draw.
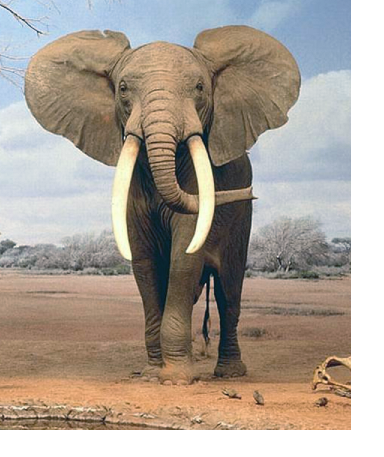 The first thing you will need to do is to select your picture. Always select a good clear image with high resolution, the clearer the image the better your elephants drawing will be. If your picture is of low quality you may struggle to see the details properly. You can do this by either using an online image provider or perhaps a magazine. Or possibly you're own image, if you have one. You can then make a copy of the picture using a photo editing suite or pre-installed paint software.
There are many available for example, MS Paint or Gimp which is free. Gimp is very similar to Adobe Photoshop with plenty of online tutorials to help you get to grips with it. If the picture's in a magazine or is perhaps an existing painting for example that you would like to reproduce, you can photograph it. Next, send the picture to your photo editing suite and print off a copy with your printer. Or scan the picture and then use it for reference.
Marking out your grid.
To mark out your grid you will first need to measure equally down each side of the copied reference picture. Using a pencil and a ruler make sure that all your spaces are the same, for example, 1cm apart. You will need to start at the top of the page and mark down all sides of the page so that when you join all your points together you will end up with a grid as shown in the example picture. 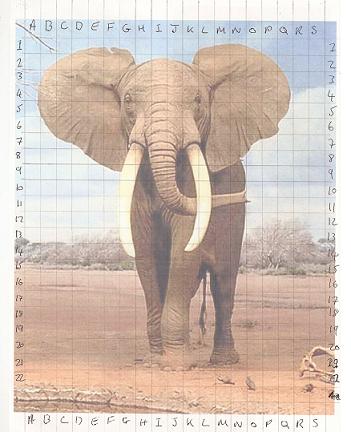
You will then need to do the same on a piece of blank paper or your sketch pad.
Preparing your Sketchpad or a blank page.
Before starting your elephant drawing it is very important that when adding the grid to your drawing paper or sketch pad you only use light pencil pressure to add your lines. They will either be covered or need to be removed as the picture progresses. Once the picture's complete and cleaned up you should be left with your reproduction picture and no visible grid lines. NB: Always make sure that you use a sharp pencil when setting out your grid. I have discovered that by using a 3mm clutch/mechanical pencil with a hard lead I can produce a light fine grid line that's easy to erase.
Drawing Elephants: Short cut.
HINT: By using a PC or Tablet to process the image you can sometimes print your image straight onto graph paper. This will save you a lot of time. Just be sure to reproduce the grid accurately on your blank page. The method works well if the image is quite light but darker images tend to hide the grid lines. This can be seen around the darker areas of my elephant in the example picture. I am using standard A4 grid/graph paper as it fits nicely into my printer.
It is also wise to scan your reference picture with the grid in place into your PC or Tablet. Storing a scanned image on your PC or Tablet with the grid applied is a lot easier to reference when you come to draw the picture. You can then use your photo editing suite to zoom in and enlarge the scanned image. This makes it easier to see how everything looks and exactly where each line crosses and meets on the grid. This really helps when it comes to adding the finer details when drawing elephants and other detailed subjects. You can also change your image to greyscale which makes it a lot easier to find your tones and values.
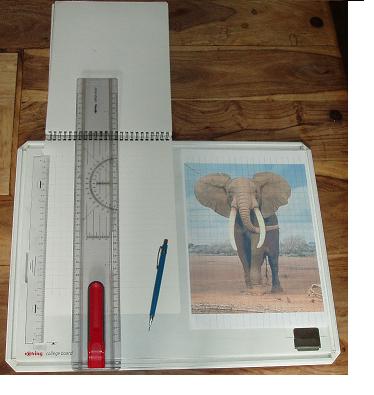
How to draw using a drawing board.
Another method I use when creating reference pictures and setting out my drawing paper or sketchbook is a Drawing board. Using a drawing board is a much quicker and less tedious way of setting out. It is also more accurate than measuring down each side of the picture. The drawing board has a rule already marked out on it.
All you need to do is to line your paper up with the preset marks on the drawing board and then move the T square between each point and draw a light line right across the page. Also, you only have to turn the page once to draw your lines both ways which save a lot of time. Unless your drawing board has a rule on both edges.
NB: you can purchase a drawing board like the one in the picture by clicking the link above or at the bottom of this page.
Drawing Elephants: Adding reference points.
With all the lines added and your grid in place, you will now need to add the reference points. Reference points help you to locate exactly where everything is. To do this You will need to add numbers down the two longest sides of the picture and the alphabet across the other two shorter sides. Unless of course, you prefer to do it a different way. This method makes it quicker to reference points along both the top and bottom of the page.
For example, referencing A5 or F9 and so on. It is the most accurate way to do it. Without reference points, it is easy to lose your place. You will also find that by doing this you will be able to work from both sides of the page making it far easier to accurately locate and reference a point or line intersection when drawing your initial outline and adding the detail to your elephants drawing.
Deciding on paper size.
NB: I am using an A4 sketchbook as it is also the same size as the original Elephant picture that I want to draw.
However, you can use any size of paper you like. By using the grid method you can use your grid to either scale up or scale down your original photo. This is done by either increasing or decreasing the size of the segments on your grid when you mark out your blank sheet.
You must remember however, that it is important to increase or decrease your grid by equal amounts. For example, if the grid on your original reference picture has squares that are 1cm apart but you want to double the size of the image then you will have to allow 2cm's between each line. Alternatively, to decrease the size of the image by half . You would have to allow 0.5cm's / 5mm between each line. Remember also that if you want to enlarge your image you may need a bigger sheet of paper to fit the scaled-up image onto.
As I mentioned earlier, I am using a drawing board to set out my pages as it is much quicker than marking the pages out separately.
NB: I am using an A4 sketchbook as it is the same size as the original picture that I'm copying. You can use any size of paper depending on how large or small you wish your elephants drawing to be.
Using the grid method to scale images when drawing Elephants.
Using the grid method enables you to be able to either scale up or scale down an original photo. This is achieved by increasing or decreasing the segment sizes on your grid when you mark out your blank sheet.
You must remember however that it is important to increase or decrease your grid by equal amounts. For example, if the grid on your original reference picture has squares that are 1cm apart and you want to double the size of the image, you will have to allow 2cm's between each line. To decrease the size of the image by half you would have to allow 0.5cm's / 5mm between each line. Remember also that if you want to greatly enlarge your image you may need a bigger sheet of paper.
As mentioned earlier, I am using a drawing board to set out my pages. I find that it is much quicker than marking the pages out separately.
Marking out a sketchbook.
NB: To mark out my sketchbook I found that I had to slightly raise my drawing board. This was to allow for the thickness of the sketch pad. To do this I placed a couple of books under the drawing board so as to raise it up slightly to allow the paper to lay freely on my drawing board. See below: Remember If you do not own a drawing board but would like to purchase one you can get a drawing board HERE. I hope you enjoy this tutorial on drawing elephants.