Drawing elephants-How to draw elephants
How to draw an Elephant in five easy steps.
Step 2: How to draw an Elephants outline:
We can now begin to draw an elephant using the simple steps provided in this tutorial.
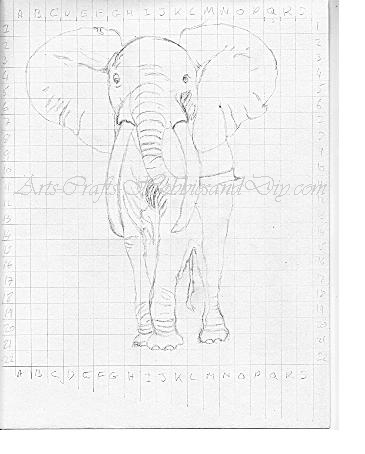 Starting from the top left or right-hand corner you can now begin to carefully copy your elephant outline.
I found that starting at the middle of the elephants head, Points 2I and 2J on my grid, then working out and up over the elephant's ears was easiest for me as I could more easily visualise what I was drawing.
However, this is not a hard and fast rule for this tutorial on how to draw an elephant. You can start anywhere you want really, it's entirely up to you. I am right handed so I find that starting at the top left, working from left to right easiest as it also limits the amount of smudging caused when I rest my hand on the picture as I draw. So once I had drawn the top of my elephants head I then began building my picture from the left.
Tip:
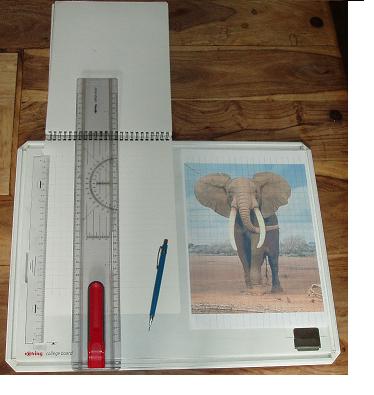
You can help prevent smudging by placing a plain piece of paper on your drawing. This method enables you to rest your hand on the page without coming into contact with the graphite. It also prevents any oils from your skin from contaminating the drawing.
How to draw an elephant outline.
Once you have your initial elephant body outline you can begin to add some of the inner detail outlines. For instance the detail lines on the trunk and the creases in your elephant's belly and legs. You can also lightly outline the areas of contrasting tone like on the ears and between the legs. This can be seen on my elephant outline picture above. These are only minor details but they will help you as you begin to build your picture. They also act as visible guides for referencing your original picture when you begin adding your values and tones.
Step 3: How to add realism to an elephant drawing.
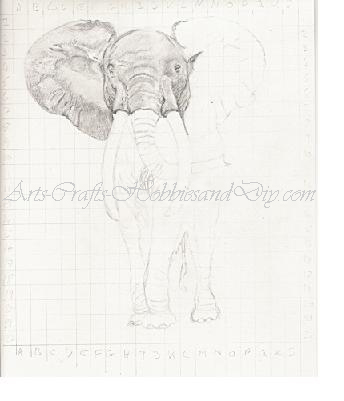
How to draw an Elephants head.
Once you have completed your Elephants body outline and are happy that you have all the outline detail you need to draw your elephant, you can begin to bring your elephant picture to life.
Adding darker tones.
Start by adding in the darker areas first. Do this by using your reference picture with the grid in place. You may also want to keep an original copy of the picture to hand. I always keep a copy of the original picture open on my PC. This gives me a much clearer visible image to look at when needed. In addition, as you are using graphite pencils to draw your elephant it helps to convert your PC image to grey scale. Depending on your printer quality, some printed pictures can lack the colour clarity and sharpness of the original.
Again begin at the top of your picture. Using a 3B or 4B pencil and a small circular shading technique. Slowly and carefully fill in the darker areas making sure not to press too hard at first. In this way, you can slowly build the depth of tone by adding more layers of graphite as you go until you are happy with the end result.
You will also be blending all the different tones into each other so do not worry if they just look like blocks of colour.
How to add lighter areas of tone when drawing an Elephant.
NB: When adding the lighter shades I tend not to shade into the lightest areas. The reason for this is that where possible I will use the darker tones surrounding the lighter areas and blend from the darker areas into these areas. For example at the top edge and middle of the elephant's ear and on the forehead of my elephant.
Once you have finished adding the darker areas of the section you are working on you can now start to add in some of the lighter areas. Make sure that you pay attention to the different tones between the lighter and darker areas. Slowly begin to build each area either by continuing to use your 3B or 4B pencil and applying gentle pressure or by using a harder lead such as a B or 2H pencil. Pay particular attention to your pencil pressures also.
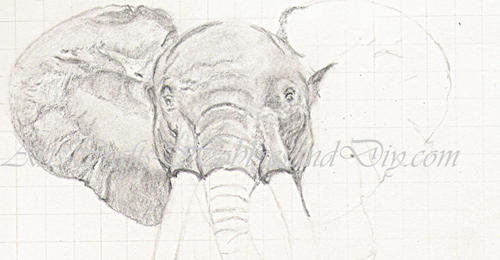
How to blend graphite.
To do this I will use a cotton bud/Q tip or a small piece of cotton wool. I carefully blend the darker tone into the lighter areas using a small circular motion so as to create the texture of the elephant's skin. Do not get too carried away when doing this or you may end up with a mass of one tone. I find that by carefully blending each area it helps create a more natural look. It also prevents any hard definite lines between the different tones and allows me to be able to control how much of the darker area I blend into the lighter areas. If you find that you have lifted too much graphite from an area you can always add a little more where necessary.
When you have done this move across your picture and complete the first step which for me is the elephants head. Once I have finished my Elephants head and ears I will then move down to its body.
How to pick out highlights when learning how to draw an Elephant.
Nearing completion, when I am happy with the overall look of my elephant I will then use a small slither of eraser that I have cut from a larger eraser, or an artists stump and pick out any highlights on my elephants ears trunk and body, just to add the final details, but at this early stage you are now ready to move on to the elephants body.
NB: you can purchase blending stumps and other products required for this tutorial HERE.