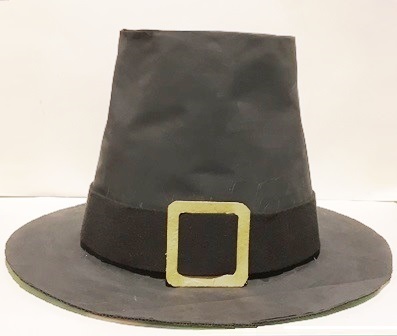
How to make a Thanks Giving Pilgrims Hat.
How to make a Thanks Giving hat.
Free Downloadable Pilgrims hat template.
Make a Thanks Giving Pilgrims Hat. NB: For this simple educational craft project you will need.
- 6 sheets of A4 craft card
- Or 4 sheets of A4 craft card and 1 Sheet of A3 craft card. Scrap card can also be used if you have access to it.
- Black paint or another form of black material such as black craft felt or black craft paper.
NB: The above is based on most people only having access to an A4 printer.
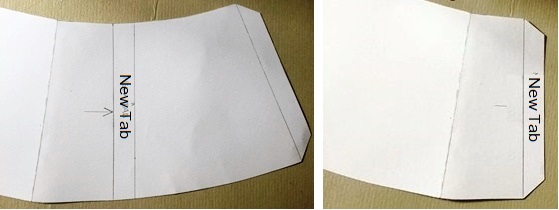
To begin, firstly, download template A.
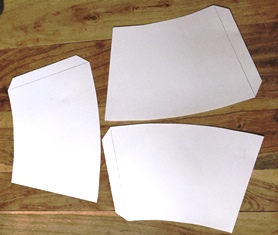
Secondly, print off three copies of template A using A4 card.
Next,carefully cut them out as shown above.
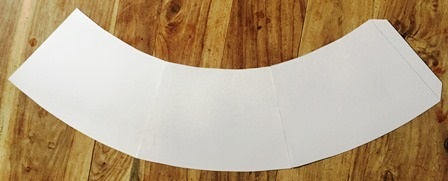
Thirdly, stick each piece together using the tabs provided as shown above.
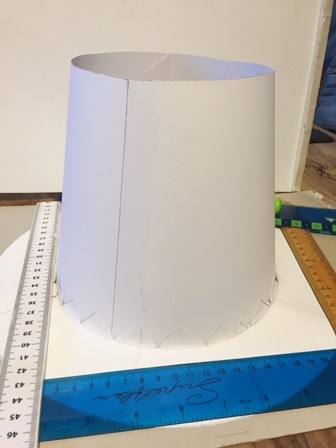
You should now have a long enough strip to make a hat to suit most head sizes.
NB: If you are planning to cover the Pilgrims hat using black felt or another material such as black craft paper then it is advisable to first use the above as a template to enable you to cut a suitable piece to cover the hat. Place the template on your chosen material and then carefully draw around it. For example, Black Craft Paper.
How to make a Pilgrims hat.
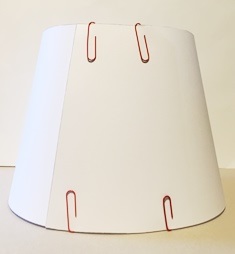
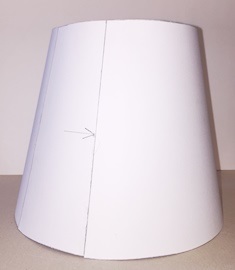
Now place the template on a flat surface and carefully bring the ends round to meet each other
Make sure that both the top and bottom edges line up and that the longest edge is flat on the table. Next, overlap the ends to form a circle that roughly fits the size of your head.
Hold the ends together and place four paper clips to temporarily hold them in place, as shown below
Adjusting the Pilgrims hat to fit.
Carefully offer the hat back onto your head and adjust its size accordingly by adjusting the template between the paper clips until it fits comfortably on your head.
With the hat adjusted now mark the edge of the overlap with a pencil as shown.
Next take the paper clips off and lay the template on a flat surface. Using the line that has just been marked measure approx 2cm's out from it and create a new securing tab. As shown below.

Now cut around the new tab and add some glue to the tab.
Place the longest edge on a flat surface checking that all edges align then bring the edges around to meet each other and secure the tab in place.
The first part of this free tutorial on how to make a Thanks Giving Pilgrims Hat has been completed. It is now ready to fit a brim and crown.
How to make Thanks giving Pilgrims hat brim.
Take 2 sheets of stiff A4 card and join them together by slightly overlapping them, as shown.
This will give you just under an A3 sized sheet.
NB: A3 card or an A3 sized piece of scrap card is better suited for this stage if available.

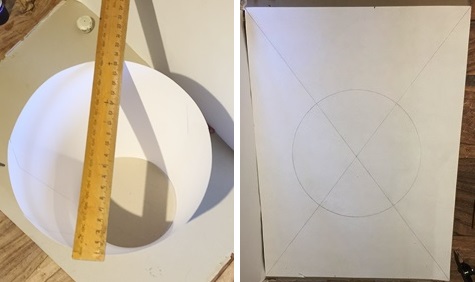
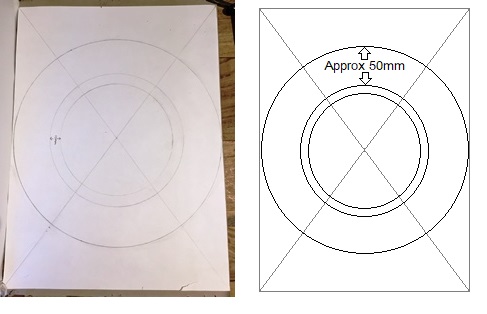
Next you will need to find the center of the page.
Using a straight edge draw a line from corner to corner forming an X the center of the page.

With that done, now take the basic hat and measure the diametre (from side to side) of the widest end of the hat then half the measurement. Take a compass and set it to the half measurement. Place the compass on the centre point of the X and draw a circle.
Next, subract 15mm from the measurement and draw a smaller circle inside the circle that has just been drawn.
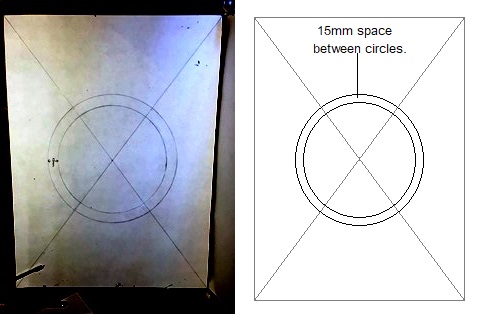
Set a compass from the center of the circle to the outer edge of the sheet of craft card and draw another circle. This should give you approximately a 50mm brim depending on head size.
Now take a right angle, such as a set square and carefully mark tabs from the edge of the inner circle. These do not have to be accurate just as long as they run all around the edge as shown.
They can also be drawn freehand if you prefer.
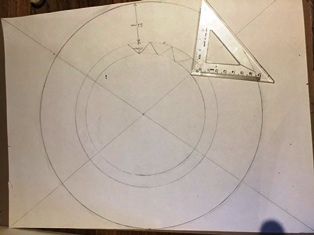
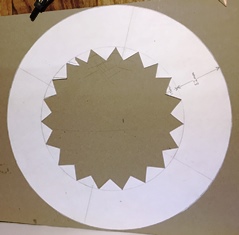
Once you have completed the above, take a sharp knife or pair of craft scissors and firstly carefully cut out the circle in the middle. Try to cut it out in one piece as it will also be used to make the hat crown.

The next thing to do is to carefully cut the brim out as shown below.
Fixing a brim to your Pilgrims hat.
With the brim fully cut out, again place it onto your chosen covering using it as a template and carefully draw around it to make the covering pieces. However if you have chosen to paint the hat black you can now apply it to the hat prior to painting.
Fixing the brim to the hat.
The next part of this free tutorial on making a Thanks Giving Pilgrims Hat is complete.
Firstly add a thin layer of glue approximately the width of the tabs around the bottom edge of the hat.
Next place it onto a flat surface.
Now gently slide the brim over the hat making sure that all tabs are facing up. Slide the brim down until its flush with the botom edge of the hat and then carefully stick all tabs in place.
NB:Placing rulers or something flat around the brim will esure that it fits flat and flush all around the hat
With the brim fixed in place. Its now time to add the crown to the hat.
To do this, you will first need to make the crown.
.
Adding a crown to a Pilgrim hat.
Next take the hat and place it onto the circular piece of card that you had left from cutting out the brim, see below.
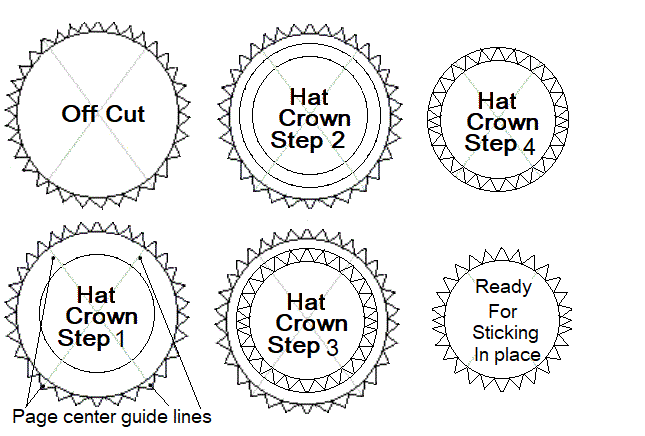
Firstly take the off cut from the brim.
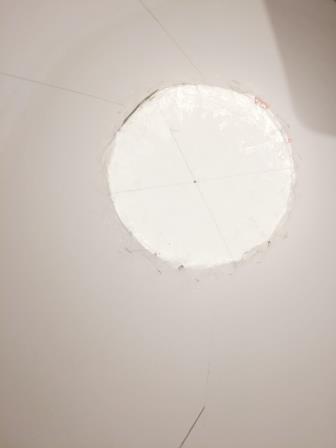
- Step 1, Place the top of the hat onto the off cut and draw around the inside edge. Try to center the hat using the existing page center guide lines. This should give you a smaller circle.
- Step 2, Next measure out approximately 15mm from the circles edge.Then using the existing center point, set a compass to the new measurement and draw a circle.
- Step 3, Next, as with the brim you will need to add tabs to the crown to allow it to be fixed to the top of the Pilgrims hat.
- Step 4. Now carefully cut around the circle and then cut the tabs.
- You should now have a piece ready to stick inside of your hat to form the crown.
Making a thanks giving hat, fixing the crown to the hat.
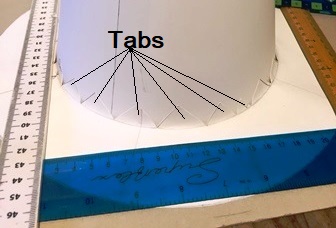
To fix the crown, first add a thin layer of adhesive to the inside edge of the top of the hat. Then offer the crown into the hat making sure that the tabs fold down toward the brim.
 Repeat the same process as with the brim making sure the edges are flush both on the inside and at the top edge.
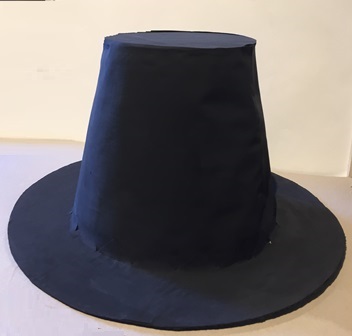
Making a Pilgrims hat, adding the finishing touches.
First covering or paint the main hat. Using the covering fabric or other material, if that was your chosen option. To begin, make sure you put the covering the correct way up to follow the profile of the hat. Offer the cover dry first, with its longest side to the brim so that it fits correctly.
Next, apply some glue to the hat and then slowly offer the covering onto it. Be sure to line its edges up as you go and try to keep the covering in order to avoid any creases. Where the edges meet, carefully cut them so that they are flush together hiding the join as much as you can.
Now fix the brim in place by first offering it over the top of the hat before slowly moving it down into place. Be sure to make sure that you align the edges of the brim for a perfect fit.
Take the crown of the hat. Stick it into place and then trim off any excess around its edges. Be carefull not to cut off more than neede as this will expose the card underneath and could damage the hat rim.
Lastly, using black paint or a Black sharpie, colour the dege of the brim.
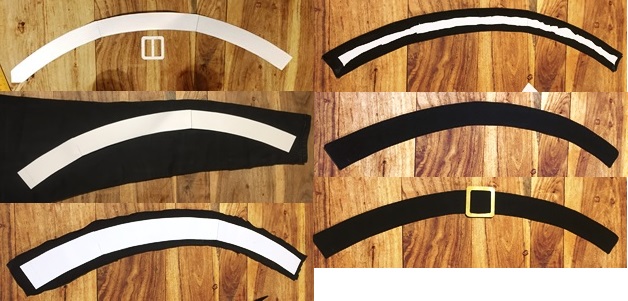
How to make a Thanks Giving hat band and Buckle.
With the main hat completed now add the hat band and buckle. Using template B provided, firstly cut out the hat band. Assemble it in the same way as you did the hat. Again, sizing it by wrapping it around the hat first.
With the band cut to size, either paint it black, or use it for as a template, as shown below to make a hat band from your chosen material.
In the images below I started by sticking the template onto some black denim. Once a pair of Black Denim stretch jeans.
Then following the steps shown I made the hat band.
Now, using template B again, carefully cut the buckle out. You could make the buckle out of a piece of colored card if you have it. Or you can cover the template provided with foil using the same method as the hat band or paint it with metallic paint.
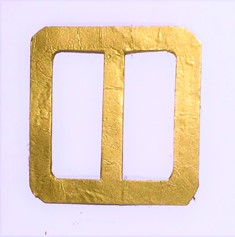
With the band and buckle assembled, thread the band through the buckle to approximately the mid point .
Finally attach the hat band and buckle to the hat making sure that the buckle is facing forward on the hat.
Thank you for using my tutorial on How to make a Thanks Giving Pilgrims Hat.