How to Draw hands.
A beginners guide to drawing hands.
How to draw hands.
Figurative art: Drawing Hands.
The first thing you need to do when learning how to draw hands is to source as many free images of hands as you can.
Using the images build a file that you can use as references to help you to start drawing hands.
Next create a page with as many different hand poses as you can get on it.
MS paint, or any other photo editing software can be used to do this. Once you have your page of reference pictures print it off. This will make it easier to reference the images before beginning to draw a hand.
How to draw hands made easy.
First study the pictures for some time to get a basic understanding of the shape and form of the hand. After carefully studying the images try to them into sections that you can sketch to form the basic structure and shape of the palm, thumb and fingers.
When drawing always try to view all things in terms of circles, squares, ovals or rectangles. By doing this it will help you understand the shapes of the images in their simplest forms. For this tutorial start with a basic picture of the hand viewed flat from above.
Drawing a hand viewed flat.
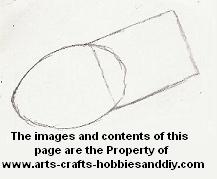
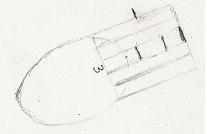
Firstly, draw an oval and a rectangle overlapping each other. Make sure that the narrower end of the oval is at the point of the wrist. As shown below.
Now find the centre of the rectangle where it crosses into the oval and make a light mark. Using this point as the middle of the index finger start dividing the rectangle into five equal parts. These will give you a rough guide to the location of the fingers and thumb.
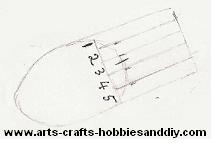
Locating the knuckles joints in a hand drawing.
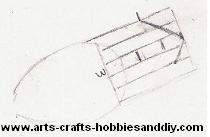
Now find the furthest most point for the tip of the index finger in proportion to the rest of the hand. Do this by comparing it with other features on the hand, including your own. Then mark it on the index finger (no3). Next divide the distance between the mark and the top of the oval into three sections. Also make sure your top section is slightly less than the other two which are spaced roughly equally apart. This will give the points for the knuckle joints. After that judge the point of the tip of the little finger. Then mark it on the edge of the rectangle by again comparing it to the other features on the hand. This point is roughly in line with the centre of the middle section of the joint of the index finger.
The next thing to do is to draw just under a ninety-degree angle from the tip of the little finger passing through the tip of the index finger and down to roughly the same point on the edge of the fourth finger on the opposite side of the hand. As shown below.
Locating the fingers when drawing a hand.
With that done, all you need to do now is to add all the points where the joints of the other fingers are located in relation to each other by comparing each individual finger with its neighbouring digits. To do this roughly copy the arc of the first ninety-degree angle making sure it passes through the points that you have already marked on the index finger (no3)
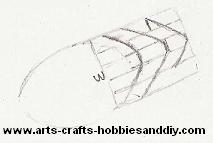
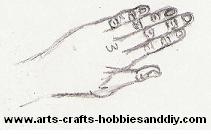
Now you have a rough idea of where everything is in proportion to the rest of the hand begin to fill in the fingers and the thumb.
Starting first with the index finger (no3) fill in between your reference points as you shape each individual digit. Treat each section as a sausage and join them together between the marks.
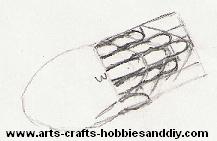
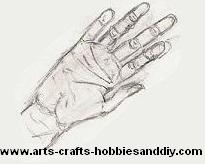
Lastly, remove all the guidelines and begin to properly shape your hand. Pay particular attention to the fingernails, knuckles, and thumb in relation to how they meet the rest of the hand. You can use your initial outline for the front of the hand also, as shown in the illustration. To spread the fingers use the same method as before only draw each digit separately in the desired position. Above all, when learning how to draw hands always make sure that you continually observe and make comparisons to other features on the hand.