The Pear shaped figure.
How to draw the pear-shaped figure.
The pear-shaped figure, unlike the Hourglass figure, Banana figure or Apple figure is considered by most to be the most common body type associated with the female figure. Listed are a few famous examples of women who are said to have a pear-shaped figure. Jennifer Lopez, Beyonce Knowles, Shakira, Kristin Davis and Rihanna.
Setting out the Pear shape silhouette.
- General characteristics of a Pear shaped female.
- Narrower shoulders.
- Smaller bust.
- A defined waist.
- Broader hips.
- Rounder bottom.
- Wide thighs.
 If you are new to drawing women and want to set out the proportions of a Pear shaped subject, refer to our tutorial on How to draw the female body for absolute beginners. This will show you how to sketch a basic wire framed figure. You can then use the general characteristics and proportions of the Pear shaped figure listed above to draw it. Below is a completed example.
Sketching a pear-shaped figure from scratch.
If you are sketching your wire framed figure from scratch you will need to follow the instructions below.
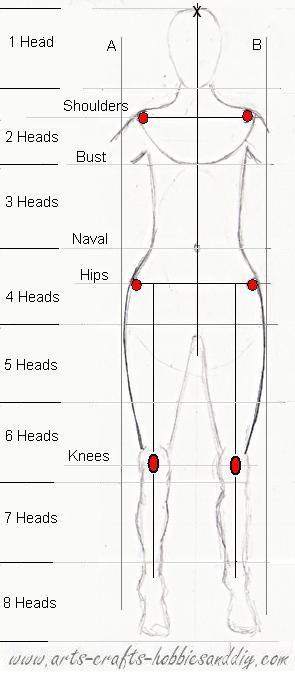
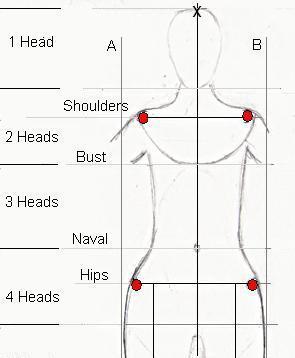
Before sketching the wireframe, first, draw a centre line marked X. From this line, add two vertical lines of equal distance to help set out the approximate hip and shoulder widths. The lines marked A and B in the example below will then give reference points for the shoulders and hip proportions.
Putting pencil to paper
Shoulder width.
With the three verticals lines marked X, A and B begin to form the pear-shaped figure. Remember, women with a pear shaped figure have shoulders that are narrower than their hips. By picking a point just inside the vertical lines, marked in red for clarity, will give the position for the shoulders at their widest point. As you can see the distance from the centre line is slightly less than those marked for the hips. ( The shoulders are positioned at approximately 1⁄3rd of the way down in the 2 heads section.)
If you are already using a basic stick/wireframe figure as a guide you will need to adjust the shoulder width accordingly. Reduce the distance of the crossbar for the shoulders equally on each side. This will then ensure that when drawing the pear-shaped figure the hips and thighs will be wider than the shoulders. Thus making the overall proportions more accurate.
Forming the pear shape.
Once the two points for the shoulders and hip widths are in place carefully sketch the outline of the pear-shaped figure.
Starting in the 1 heads section draw an oval. This will form the basic outline for the head. Once you have done this you can add the neck.
Draw a curving line from approximately 1⁄4 of the way up the head and gently curve it down and out to the point where you have marked for the shoulders at their widest point. Remember, the shoulders must be narrower than the hips.
Then add the position of the arms by drawing in two points for the top and bottom of the arm. That is where the arm meets the shoulder and where it meets the body to form the armpit.
From the armpit, draw a line, as can be seen in the example to the right.
It will need to be from the armpit to the waist. This will be somewhere in line with the navel (belly button at the 4 heads mark). Make sure the line is not too curved as this may over exaggerate the pear shape. Using a straighter line will also help to emphasize the hips giving your subject a more rounded pear-shaped appearance.
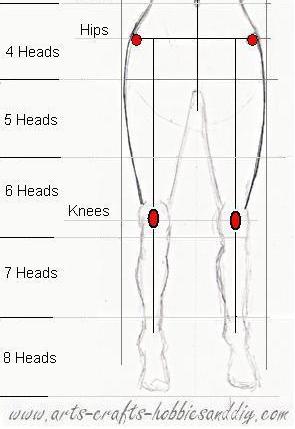 Following on down from the waist begin to gently curve the line out to the outer vertical lines at A and B to form the widest point of the hips and the tops of the thighs, This will also help to create the rounded appearance that is characteristic of the pear-shaped figure.
Drawing Legs.
Next, begin to curve the line back in and down to the knee continuing on down the leg.
Women with Pear shaped figures also tend to have good calves. Therefore, when drawing the lower part of the leg, emphasize the calves slightly to make them more prominent.
Using the same principle sketch the inside of the legs also.
You now have a basic outline and are ready to add the arms, bust, feet and hands and bring your Pear-shaped figure to life.