How to draw an hourglass figure.
The hourglass figure
In this basic tutorial, I will demonstrate how easy it is to draw an hourglass figure.
As our bodies vary so much I am only going to give a few basic examples of how to draw them. With this in mind, I will only be dealing with what I consider are the four main female body shapes.
The four main body shapes for women.
These are the Hourglass, the Pear, the Apple, the Banana/rectangle/cylinder. All four body types are easy to alter to produce your own finished figurative portrayal of the female body.
The hourglass figure.
The first body shape I am going to draw is the hourglass figure. This body shape was most popular around the 1950s. During this period, the average women's waist measurements were estimated to be around 27 inches. Its name derived from, of course, the hourglass which was an instrument used for measuring time. It was and still is for many men considered to be the most desirable and attractive shape for a woman.
Actresses with an hourglass figure.
Back in the late 1940's and early 1950's pinups such as Betty Brosmer, Ava Gardner, Marilyn Monroe, Jane Russell and Gina Lollobrigida were all said to have the perfect hourglass figure and were iconic for their time.
This meant that, as with the shape of the hourglass, their figures were noticeably narrower in the middle. Meaning that their waist measurement was a lot smaller than the hips and bust. These, in turn, had equal proportions to each other, thus creating the curvaceous hourglass silhouette, emphasising a curvier more desirable shape with broader hips and a larger more emphasised and shapely bust. The hourglass figure can however also be achieved using hourglass corsets and other carefully selected items of clothing.
Setting out the hourglass silhouette.
The first step before learning how to draw an hourglass figure is to decide the proportions of your subject.
Proportions of an hourglass figure.
- The shoulders and the hips are the same widths.
- The waist is narrow creating the hourglass shape.
- The bust is also the same width as the shoulders but appears more emphasized due to the narrowness of the waist.
The first thing to do is to sketch a basic stick person or wireframe figure using the information above. You can learn how to do this by visiting How to draw the female body for absolute beginners.
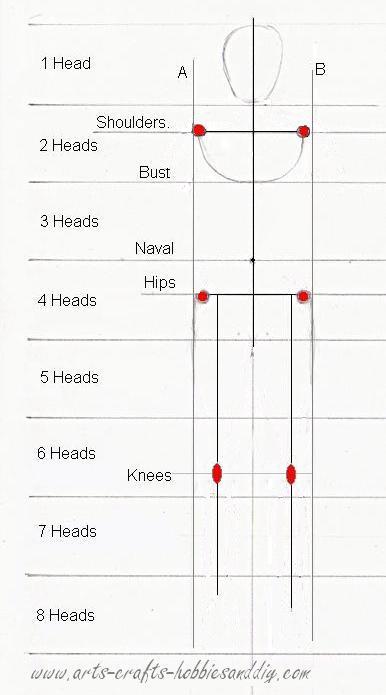
Using a stick person will help to accurately judge lines and ensure that both the hip and shoulder dimensions are almost symmetrical when starting to draw the basic outline of the hourglass figure. As shown in the example.
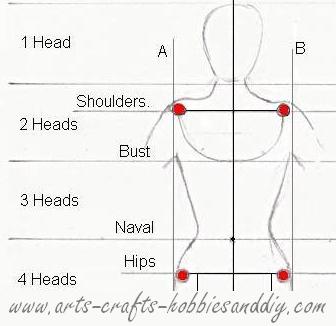 To draw the basic outline, start by drawing a basic oval shape for the head. Next, add the neck. To do this curve a line down, as shown, to form the sides of the neck. Next, continue the line out to the point marked for the shoulders and then on slightly to form the very top of the arm where it joins the shoulder. The shoulders are at approximately 1⁄3rd of the way down in the 2 heads section.
How to draw the hourglass body.
With that done on both sides, you are now ready to continue with the rest of the body.
From the point where the lower part of the arm meets the body i.e. the armpit.
This is the point where the bust line touches the outer vertical lines at both A and B. This point is at the start of the 3 heads section.
Continue the body outline from this point making sure that the lines gently curve in towards the waist just above the navel. The navel is located at the start of the 4 heads mark. Make sure that the curve looks natural and it is not too acute. This will form the top half the hourglass.
How to draw hourglass hips.
The hourglass figure drawing should now be taking shape.
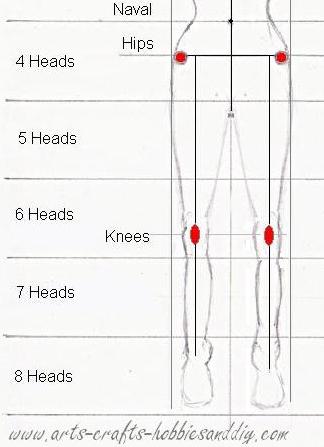
Next, continue the line from the waist back out to the points marked for the outer lines at the hips. This again is within the 4 heads section as shown, and again uses both the lines marked A and B as the widest point for the hips.
How to draw thighs and legs on an hourglass figure.
 Your hourglass figure is now really taking shape.
Now you only need to begin to curve your line back in at the hips then continue it on down the thighs. Make sure again that the lines curve naturally down the leg to the knee. The knee is just above the 7 heads mark, about 3⁄4 of the way down in the 6 heads section. Make sure the knee is slightly exaggerated as the lines around the knee will always be slightly more prominent because of the knee joint. From the knee continue on down to the ankle at approximately the 8 heads mark and add the feet.
To form the inside of the legs, start at the crotch area which is located on the centre line at the point just below the top of the 5 heads section as shown.
Curve the line in toward the knee to form the top of the leg. From the knee, curve the line out slightly and down toward the foot at the 8 heads mark to form the ankle.
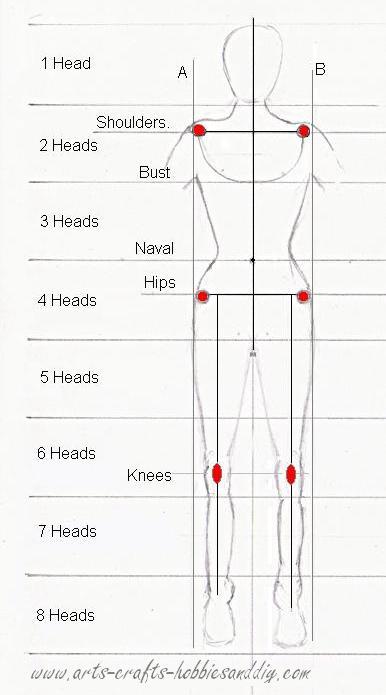
With your hourglass figure outline complete you are ready to add some features to start bringing her to life. If you are drawing Manga characters then you can also use the example above to set out your body proportions.